How to talk to a C# / ASP.Net web service via Ruby / Rails

Maybe not the right answer.. but I took the path of least resistance and succeeded. Yay Ruby!

First I did a dummy Asp.net Xml Web service as shown in this MSDN walkthrough which does F to C temp conversion. This meant that I can access my legacy/existing C# code without any interop hassles. Yes it is SOAP based (and old-school) but it will have to do for now. You can test out the web service via a dummy stub page that exercises the web service. You can also infer the needed urls from this page.

Next I found this uber-blog post by Ryan Heath and it was all downhill after that.

You write a wrapper Ruby class like this which gets the WSDL and sets itself up. You can then just call your Web methods on it!


   require 'soap/wsdlDriver'

class TempConverterWrapper
attr_accessor :endpoint, :service_name
def initialize(endpoint, service)
@endpoint = endpoint
@service = service
end

def convert_fahrenheit_to_celsius(temp)
soap = wsdl.create_rpc_driver
response = soap.convert_fahrenheit_to_celsius(:temp_in_fahrenheit => temp)
soap.reset_stream
response.convert_fahrenheit_to_celsiusResult
end


private
def wsdl
puts "http://#{@endpoint}/#{@service}.asmx?WSDL"
SOAP::WSDLDriverFactory.new("http://#{@endpoint}/#{@service}.asmx?WSDL")
end
end


Your main / irb code to exercise this web service. More bang / LOC!

puts "Enter a fahrenheit value to convert to celsius... via a Web Service"
temp_fahrenheit = gets.to_f

wrapper = TempConverterWrapper.new('localhost:1464', 'TemperatureConverter')
puts "The corresponding celsius value is #{wrapper.convert_fahrenheit_to_celsius(temp_fahrenheit)}"

How to show a Tree (TreeView) in a Rails view?

Well there seems to be no one-way for displaying a tree in Rails. But it has to be some javascript/AJAX doing its thing with CSS on HTML lists. So I took a look at YUI Tree (the first thing that google threw up) but it felt bloated and the learning curve was a bit too steep. Some time later.. I found a tree plugin for JQuery and also found that there is a RailsCast to use JQuery with Rails (so I knew its possible to interop).
I've been wanting to look at what JQuery is - with the massive good-will it is building up. Did a couple of tutorials 1 and 2 on their site to get started. Downloaded the jquery.js file (1 file for all the goodness !! awesome).
Next it's time to download the zip for the excellent JQuery tree plugin by Jorn Zaefferer - incidentally its the same person who wrote the second tutorial. I felt better about my chances for success.

I'm assuming you have a Rails app and the code for your hieararchy all done to this point. It's going to be a simple tree showing the hierarchy (no fancy AJAX callbacks or delayed loading of children... although I think its supported)

Unzip the treeview plugin folder v1.4 (it has a version of jquery bundled too inside the lib subfolder). I see
  • jquery.treeview.XXX.js (the javascript files) : Moved them to my public\javascripts folder within my Rails project folder. Also copied the lib subfolder here.
  • jquery.treeview.css (the CSS stylesheet) : Moved them to my public\stylesheets folder
  • images subfolder : Moved the images in this folder to a new subfolder public\images\jquery.treeview.images
Now the CSS file has references to the images. So do a find-replace to make sure all the images are reachable in their new locations; "url(images/" becomes "url(../images/jquery.treeview.images/"

I have a show action on my controller that creates @root_node which is a typical Node object with a Children attribute - an array of child nodes. So now we need something to render it as an hierarchical HTML list - a Rails helper method for your controller


  def display_segment( node )

html = "<li>"
node_class = node.children.length == 0 ? "file" : "folder"
html << "<span class=\"#{node_class}\">#{h(node.to_s)} </span>"
html << "<ul id=\"children_of_#{h(node.sid)}\">"
node.children.each{|child_node|

html << display_segment( child_node )
}
html << "</ul></li>"
end


Let's also take a look at the view show.html.erb


<html>
<head>
<h3> You are viewing <%= @data_file_path %> </h3>

<title><%= controller.action_name %></title>
<%= stylesheet_link_tag 'appstylesheet'%>
</head>

<body>
<ul id="my_tree" class="filetree">
<%= display_segment(@root_node) %>
</ul>

</body>
</html>


Things to note
  • First we need an enclosing ul block with css class set to filetree. This would be picked up our custom javascript snippet to JQuery-magically turn into a tree. So we need to make a note to give it a good id - here my_tree
  • Next the content is rendered via our recursive helper function. Children of a node are in a nested ul block. Each leaf-node is a li item and has css class as "file". parents have css class as "folder"
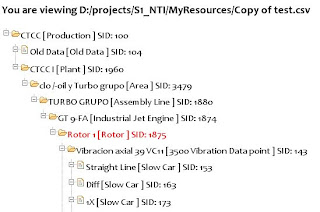
So now it should look something like this.


Now the stage is set for JQuery to do its thing. First lets introduce these 2 lines to the head tag of our view.


<%= javascript_include_tag 'lib/jquery', 'jquery.treeview', 'custom' %>
<%= stylesheet_link_tag 'jquery.treeview.css' %>


So we say we want to use the jquery javascript file, followed by the treeview plugin and finally our own custom javascript file that we'll write next.
We also want to use the treeview CSS stylesheet. You can do a "View Source" in firefox to see what the translated HTML looks like - std. stuff.

We're nearing the end here - Our \public\javascripts\custom.js file to sprinkle some JQuery dust on this thing


$(document).ready( function() {
$("#my_tree").treeview();
} );


Here we're giving a function to be executed when the page/document is ready. This function finds our top-level list element with id = "my_tree" and calls the treeview() method on it.


Victory Jig time!

Illustrated How to do a simple C++ DLL project in Visual Studio ?

Agreed that it isn't a big deal ... however I struggle with this everytime I dip my toes after a long managed stint.. and after a question on stackoverflow - it seems I'm not alone.

So here goes.. Fire up Visual Studio

Ctrl+Shift+N to go to the new project dialog or Right click on the Solution Node - Add - New Project... Press Next instead of Finish to go to the next screen.


So when I do that I have the following structure.
  • Stdafx.h & stdafx.cpp – defines and includes standard header files. Leave unmodified.
  • WinHookFacade_VS2005.cpp – defines the DLL Main function (entry point). Leave unmodified unless you have your very own dllmain.cpp with custom code.
  • Readme.txt – just a text file, you can stuff some info in.


Try to build the project. It should build fine.. do it just to be sure.
Next step include all your .h and .cpp into the project. Right click on the project in solution explorer - Add - Existing item..

You may have build failures.. now its time to enter the maze of C++ Project settings

C++ Settings


If you want additional directories to be looked for resolving header includes. Right click on Project Node - Properties
IMPORTANT: Check the Configuration combobox to read “All Configurations” each time you change a project setting else you risk the debug and release configurations getting out of sync.


Also for some reason, precompiled headers are frowned upon at my workplace. So I turn them off too..


Define any preprocessor symbols you want to.
DETOUR example.. WINHOOKFACADE_EXPORTS is a symbol defined here - which will cause my functions to be exported from here. Referencing projects will not have this symbol defined and will import my functions. The header files begin like this


#ifdef WINHOOKFACADE_EXPORTS
#define WINHOOKFACADE_API __declspec(dllexport)
#else
#define WINHOOKFACADE_API __declspec(dllimport)
#endif

void WINHOOKFACADE_API Hook();


Also in this case, you may want different symbols defined in both configurations. E.g. DEBUG is defined only in Debug configuration and so on.. so change the Configuration Combobox accordingly before making changes.


Linker Settings


To change the default location of the built binary file: E.g. I want the output to be generated in a SolutionDir\bin\Debug or Release. So you can use the helpful macros by pressing the tiny button on the right of the input field
$(SolutionDir)bin\$(ConfigurationName)\$(ProjectName).dll


I also keep the lib files that I need to link to in SolutionDir\bin\lib subfolder. So specify the additional folders to scan for .lib files


To specify the lib files you need to link to...


To specify where the lib file for the current project should be generated. In my case I want it to also go in under SolutionDir\bin\lib and named WinHookFacade_Debug.lib or WinHookFacade_Release.lib
Use the GUI macro helper thingie to come up with your own incantation. In my case it is

$(SolutionDir)bin\lib\$(ProjectName)_$(ConfigurationName).lib


Pre-Post Build steps:
If you’d like to do some tasks (like copying over something) before or after a build, check out the Build events node under Configuration Properties. I’d recommend against using this.. having this in the build script (e.g. ant or nant) makes it more visible – it tends to get hidden and out of sync in the project properties.

Phew! That's it. Take a nap now to recharge those brain cells.